Ready to add some images or graphics to your page? The first one I want to show you is the Background image. Remember how we choose a color for our background way back in Lesson 4? Well, we can also use a graphic for our background. You can use a graphic that will take up the whole page or use a smaller graphic that will multiply itself until it fills up the page...this is called tiling (sorta like tiling a floor).
First of all I want to explain the kinds of files we can use for ANY graphics. On the internet the only graphic files that we will be able to see and use are in the .gif or .jpg extensions (the extensions are the three letters after the dot). Most graphics that you download will be in either one of these two formats.
OK...remember back in Lesson 1 and the Saving tips...where we created a folder called HTML Docs on our hard drive? Let's create a sub-folder inside the HTML Docs folder called Graphics...and inside this folder we will create some more sub-folders called....Lines, Buttons, Holidays, Backgrounds, Animated, Email, Words, Country...etc. Don't create too many, you can always go back and create a sub-folder later on. Now, whenever you download a graphic off the net you will go to your HTML Docs/graphics/whatever file to save the graphic too. If it does not fit any of your folders drop it inside the HTML Docs/graphics folder and sort it later on.
To save your graphic all you need to do is RIGHT click right on top of the image and choose the option that says Save As... a new box will come up on your screen (Mac users will press down on their mouse button and hold it for a few seconds until an option box comes up). This is where you will want to find your folder (above) to drop the graphic into. Go to the top of this box, where it says Save in: and click on the down arrow and choose the folder you want to put the graphic in.
Always check the name of the graphic you are downloading, because now is the time to change it, if need be. Sometimes the names do not fit the graphic...the owner will call it something like 123456.gif for an image for email. This is found at the bottom of the box and is called Save as... All you need to do here is delete the words/numbers BEFORE the dot and put in the name you want to call the file.
Remember that you can only save ONE image with the same name per folder on your hard drive and on the server you will be uploading this image too. Your system will tell you if you try to name something the same as a file already there, but when you go to upload your image on your server it will not be as nice. It will just upload the new image on top of the old image, which will change the appearance of another page you have up.
Okay...you found an image and you like it. Download it using the RIGHT click button to your hard drive to one of your folders in the Graphics folder (Mac users will press down on their mouse button and hold it for a few seconds until an option box comes up). If you know right now you will be using it for one of your HTML documents you might choose to download the image right into your HTML Docs folder. PLEASE download the image...do NOT try to link to the image on the page you found it. First of all the owner will not appreciate this...it puts a lot of stress on the server they are using, and secondly, because people still do this, the owner's have gotten smarter and they move the images, which makes your link no longer good and then you will have NO graphic!
Once you have saved the image on your hard drive you will be able to view it on your HTML document. Remember it does have to be in the same folder as your document. Example: we named our document lesson.htm and our image is called dog.gif, they must both be in the same folder (the folder is called Lesson).
Let's get started...
You can also create more sub-folders inside the Holidays (Christmas, Easter...) and the Animated (lines, email, buttons...) folders. Animated graphics are graphics that move. Believe me when you start searching for graphics these folders on your drive will become very handy.

The BACKGROUND tag will allow you to use an image for your background. This tag is going to become a part of your original BODY tag...way at the beginning of our page. Remember where we put the BGCOLOR tag to add color for our background, well we will be getting rid of this part of the tag and adding the new background tag in it's place. The new code:
BACKGROUND="graphicname.gif"
This is our original line: <BODY BGCOLOR="000000">, or whatever color you chose for your background. You will also have all the text and link information in this line...we will not be changing that, just leave it there.
So our new tag will now look like this: <BODY BACKGROUND="graphicname.gif">, of course we will be changing the name of "graphicname.gif" to the actual name of the graphic you want to use.
Choose a background from one of these and save it to your drive (instructions above) and remember to upload it to your server with your HTML document. When you LEFT click on these images...called Thumbprints (which are smaller versions than the actual sized graphics) you will be taken to another page. This is where you will download the full sized image, by RIGHT clicking on it.

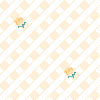


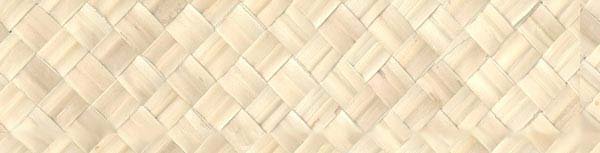
These images are some that I found surfing on the net. They are free for anyone to use on their own homepages. A list of the sites I found them on are located on this Graphic Link page. (Always give credit to where credit is due!)
Change your background color to a background image.
Remember to go and change your text color in your BODY tag if it is unreadable because of the new background (Lesson 4).
More about the images we are going to use on our pages. Remember we said that there were two basic types of images, here are the descriptions of them...
The code: <IMG SRC ="imagename.gif">
First we need to replace the imagename.gif to the actual image name we are going to use. We also have to write this name down to upload it to our server when we upload our HTML document.
Let's try using this image...the name of the image is htmlhelp.gif and it is 100 wide x 100 high pixels, size is 10K.
So our basic code would look like this: <IMG SRC ="htmlhelp.gif">
Did you notice that when you put the cursor over the above graphic that you get words come up that say "HTML Help page at WCNet"? This is part of the ALT tag and is attached to the IMG SRC tag. So the actual ALT tag using the same words would look like this:
ALT="HTML Help page at WCNet"
ALT is the abbreviation for the word Alternative and provides a word or sting of words for your image on your page. If someone has a text only browser or has images turned off (so the pages load faster) they will only see an icon in the spot the image should be. This does not tell them anything...what the image is or if the image is a link to another page.
Using the ALT tag you can provide that information for them. When you move your cursor over that image, the words you put on the ALT tag will also come up on the browser window for the viewer to see or read.
Our whole code...so far...looks like this:
<IMG SRC="htmlhelp.gif" ALT="HTML Help page at WCNet">
Now let's add the HEIGHT and WIDTH dimensions of the graphic. NOTE: you should use the actual height and width dimensions of the graphic you are using...if you want to decrease them, this is also okay, but you have to do it equally...so the graphic is not too fat or too tall. If you try to make the graphic larger, 9 times out of 10 it will get blurry. Also, if you do decrease the size of your graphic by changing the height and width dimensions, remember that the whole image will still have to load...meaning the original pixel size of the image.
HEIGHT and WIDTH are measured in pixels...how many dots per inch the image takes up...quite a bit different from inches or centimeters. You can use Paint in Windows to find out the pixels of the image. Open up the image in Paint and choose from the menu...Image...Attributes. Be sure to write down Height or Width next to your number.
Your code will look like this: HEIGHT=" " and WIDTH =" "
The numbers will be inserted between the quote marks, without spaces. These codes will also go inside our IMG SRC tag for the graphic. Like this:
<IMG SRC="htmlhelp.gif" ALT="HTML Help page at WCNet" HEIGHT="100" WIDTH="100">
The next one is one I always use with my graphics....if you do not use the BORDER="0" code you will end up with a colored border around your graphic when you add your link to it (see the next graphic). BORDER="0" says it all...you are telling your border to be zero...no border around the image. So...let's add this tag to our code:
<IMG SRC="htmlhelp.gif" ALT="HTML Help page at WCNet" HEIGHT="100" WIDTH="100" BORDER="0">
Some graphics you will want to use as a link...others you will not. If you should want to use your graphic as a link, you would use the above code in between your link code. If you choose not to use the Border="0" command this is what your linked graphic will look like:
Now let's see what happens when we use the BORDER="0" code:
Put your cursor over the image...without clicking...and you will see the ALT code come up and on the bottom of your browser window will be the address this link is going to take you.
Your code for using a graphic as a link:
<A HREF="http://wcnet.org/~htmlhelp"><IMG SRC="htmlhelp.gif" ALT="HTML Help page at WCNet" HEIGHT="100" WIDTH="100" BORDER="0"></A>
Add this graphic and code to your document and save it. You have to download the image and save it to your drive and then upload it to the server, when you upload your html document (lesson.htm).
EMAIL Images: You can also use graphics for email. There are many available on the net to download and use for free. I have made a few here for you to use, if you'd like to. You can download any or all of them. Here they are:


Let's try using one for an email link...put your cursor over this graphic to see the email addy come up on the bottom of your browser.
The code: <A HREF="mailto:htmlhelp@wcnet.org"><IMG SRC="em4.gif" ALT="Email 4" BORDER=0></A>
Try adding one to your page.
There are many types of graphics you can use...cartoons, country items, animated graphics, icons, lines, buttons, bullets...the list is endless. Speaking of lines...which are items that help split up your page horizontally...there is one easy one you can learn. It is called the Horizontal Rule and looks like this: <HR>
There is no closing tag for this one but we can add things to it. Here is what it looks like all by itself:
Let's try changing the width of the line with this code: SIZE="5" Yes, you guess it, the Size= goes right inside the HR code.
This is what your code looks like: <HR SIZE="5"> See how the above line got a little wider than the others? You can use any number you like here.
Now let's try changing the width (going across the page) of our line with this code: WIDTH="60%" Again the new code goes inside our HR code and you can change the percentage from 1-100 percent.
Our code now: <HR WIDTH="60%" SIZE="5">
Well...you might want to align your line on the RIGHT, LEFT or CENTER it. This is another code we can add to the line: ALIGN=" " Using the word RIGHT, LEFT or CENTER in between the quotes.
Another neat command to add here called NOSHADE...your line will come out solid. This one is very easy, just key in the word NOSHADE in your HR code...like this: <HR ALIGN="RIGHT" WIDTH="60%" SIZE="5" NOSHADE> Note that I aligned this one to the RIGHT below.
Want another color...just add the COLOR=" " command inside the HR line...like this:
Code: <HR ALIGN="RIGHT" WIDTH="60%" SIZE="5" NOSHADE COLOR="ff0000">
Put some horizontal rules in various places on your page in any format you want to. Be creative!
Please use the email link below if you have any questions about your lesson.

